12 Stability Ball Exercises Perfect for a Full Body Workout
Did you know you can use a stability ball to create an entire full body workout? Today I want to show you 12 stability ball exercises, and how they can be used to create a workout that will challenge your entire body (not just your core)!
Stability balls are most well-known for their ability to help strengthen your abs and other core muscles – which they do an awesome job at! But stability balls are a great way to improve balance and coordination as well, recruiting muscles throughout your entire body to help you gain control during each movement you are perform in an unstable environment.
12 KICK-BUTT STABILITY BALL EXERCISES
UPPER BODY
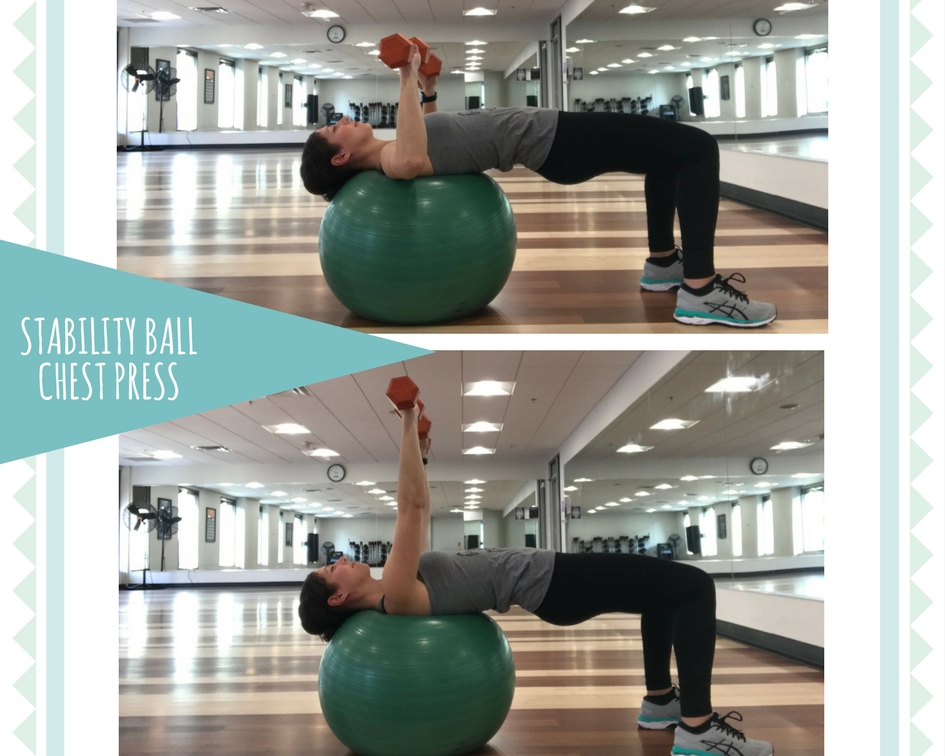
Stability Ball Chest Press: Your upper back, shoulders and neck should be resting on the stability ball. Lift your hips and squeeze your glutes to create a nice straight line from your head to your knees. Place your feet about hip width apart to help stabilize yourself. Holding a set of dumbbells directly over your shoulders (palms facing towards your lower half), brace your core and bring your elbows to a 90 degree angle, squeezing your shoulder blades. Press the dumbbells back to the starting position. Repeat.
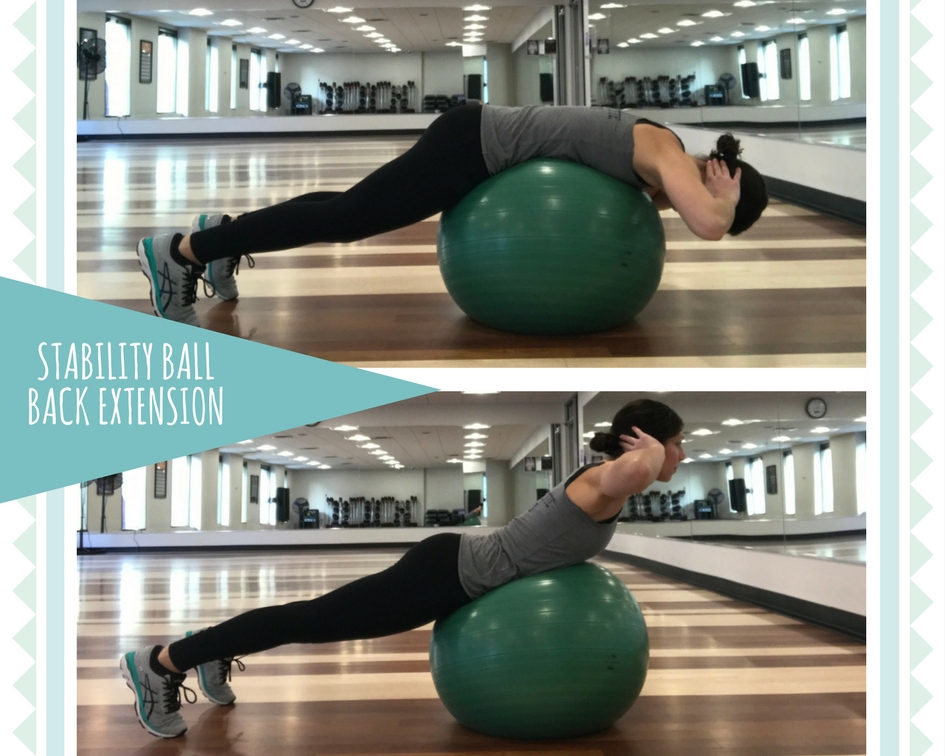
Stability Ball Back Extensions: Place your feet about shoulder width apart, resting your core on the stability ball, hands placed behind your head (as depicted in the first image). Squeezing your glutes & back, lift your upper body off the stability ball, creating a straight line from head to toe. Hold here for 1-2 seconds. Return to the start, controlling your body on the way down.
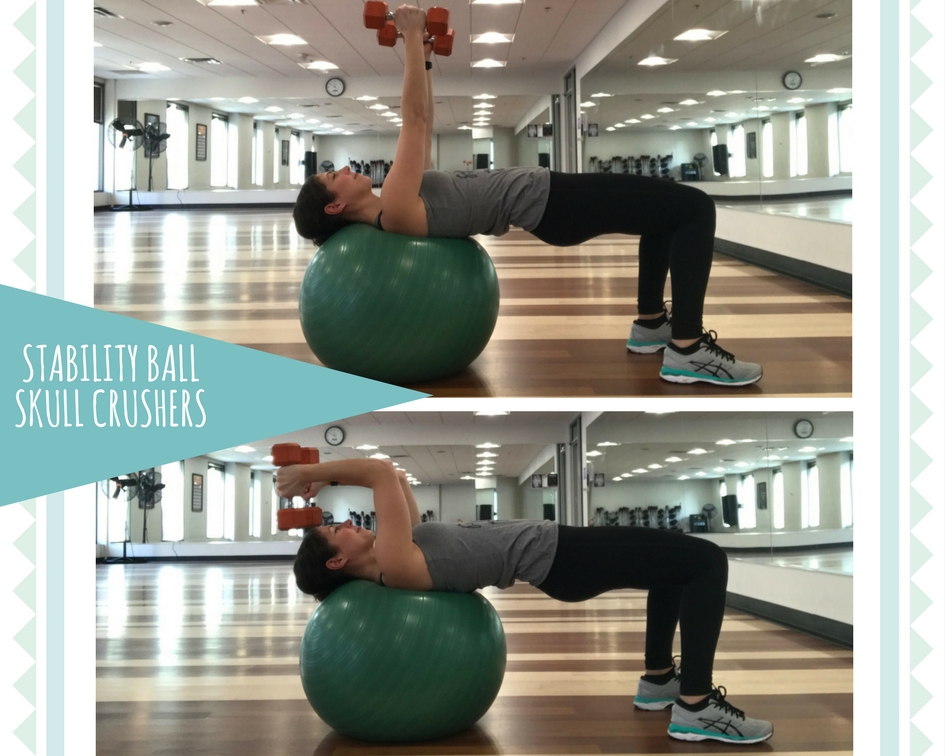
Stability Ball Skull Crushers: Your upper back, shoulders and neck should be resting on the stability ball. Lift your hips and squeeze your glutes to create a nice straight line from your head to your knees. Knees bent, place your feet about hip width apart for stabilization. Holding a set of dumbbells directly over your shoulders (palms facing towards each other), brace your core and bring the weights slowly toward your head, until your elbows create a 90 degree angle. Slowly bring the dumbbells back to the starting position. Repeat.
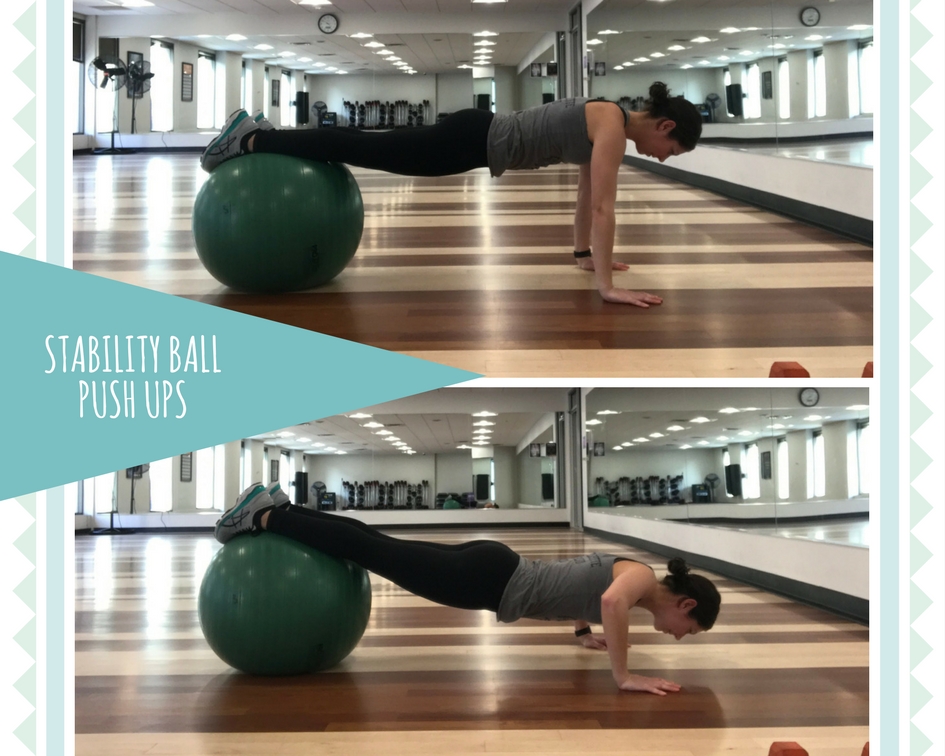
Stability Ball Push Ups: Place your feet and shins on the stability ball, your palms on the floor. Create a flat board with your body, bracing your core, being mindful that your hips do not sag and your butt does not lift up too high towards towards the sky. With your hands at about shoulder width apart, drop your upper body towards the floor, until your elbows are bent at a 90 degree angle. Pushing the floor away from you, return to the starting plank position. Repeat.
CORE
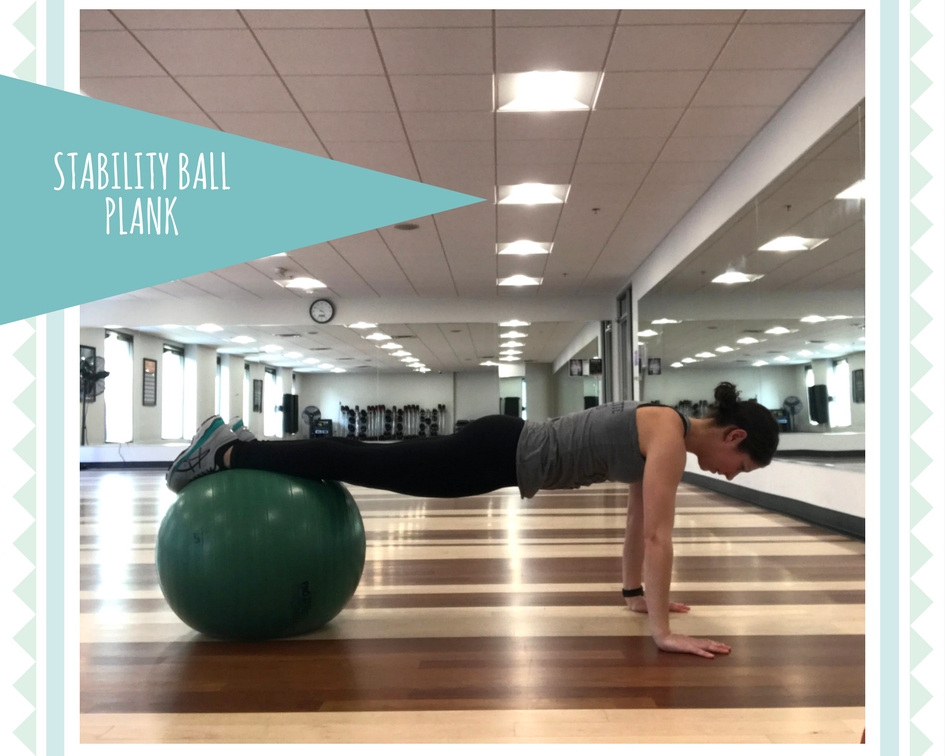
Stability Ball Plank: Place your feet and shins on the stability ball, your palms on the floor, wrists under your shoulders. Create a flat board with your body, bracing your core, being mindful that your hips do not sag and your butt does not lift up too high towards towards the sky. Hold the position here.
Trainer Tips: The more your body is on the stability ball, the easier this exercise will be. If you place your thighs on the stability ball, for instance, the plank will be easier to hold. On the flip side, if you roll out to where your feet are the only body parts on the stability ball, it will make this move more difficult.
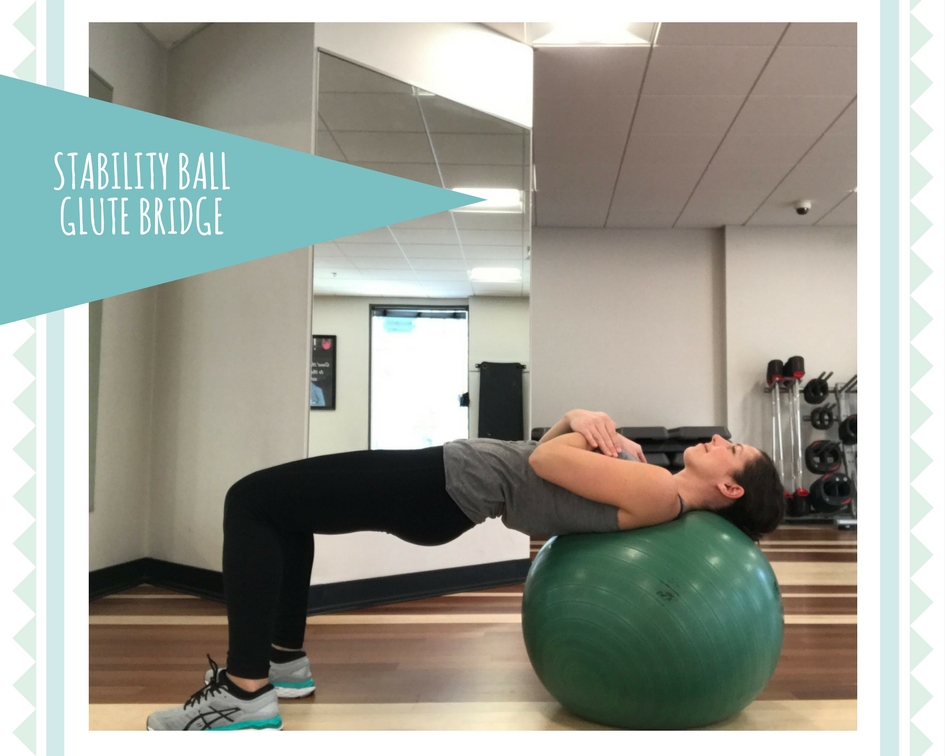
Stability Ball Glute Bridge: Your upper back, shoulders and neck should be resting on the stability ball. Lift your hips and squeeze your glutes to create a nice straight line from your head to your knees. Place your feet about hip width apart to help stabilize yourself. Feel free to place your hands on your thighs or crossed over your chest – whichever is most comfortable for you. Hold this position.
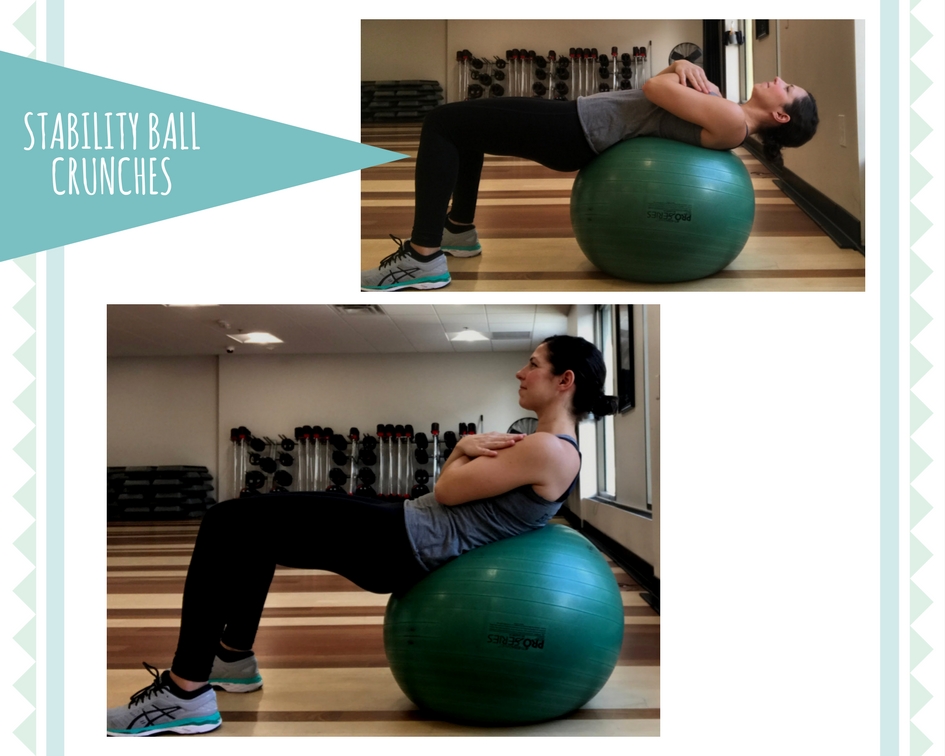
Stability Ball Crunches: Position the stability ball at the small of your back. Place your feet out in front of you (about hip to shoulder width apart), your knees bent, to help stabilize yourself during this exercise. Start by resting your back on the stability ball, crossing your hands over your chest or behind your head. Brace your abs, squeezing them so your shoulders naturally curl up and off the stability ball. Slowly return to the starting position.
Trainer Tips: Crunches can very easily become less of an ab exercise and more of a neck strain when you start leading with your neck. If that’s the case, place your hands behind your head during this exercise and really focus on creating this movement with your abs, not your neck.
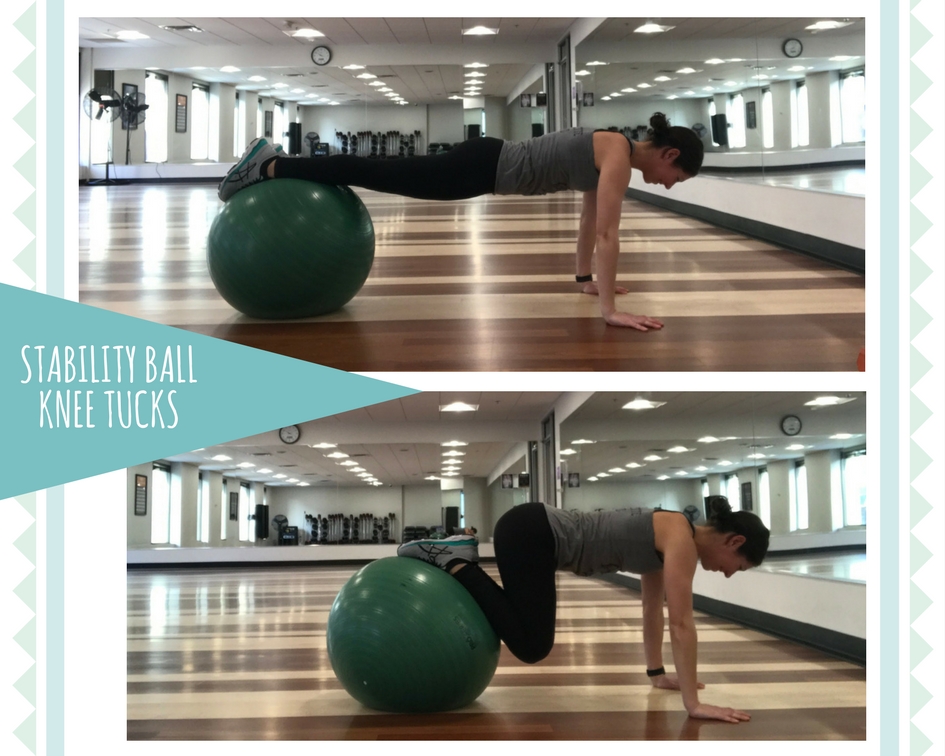
Stability Ball Knee Tucks: Place your feet and shins on the stability ball, your palms on the floor. Create a flat board with your body, bracing your core, being mindful that your hips do not sag and your butt does not lift up too high towards towards the sky. Once you feel stable in this plank position, slowly tuck your knees in towards your upper body, rolling the stability ball in towards you. Once knees are tucked (as shown in second picture above), roll back to the starting position. Repeat.
LOWER
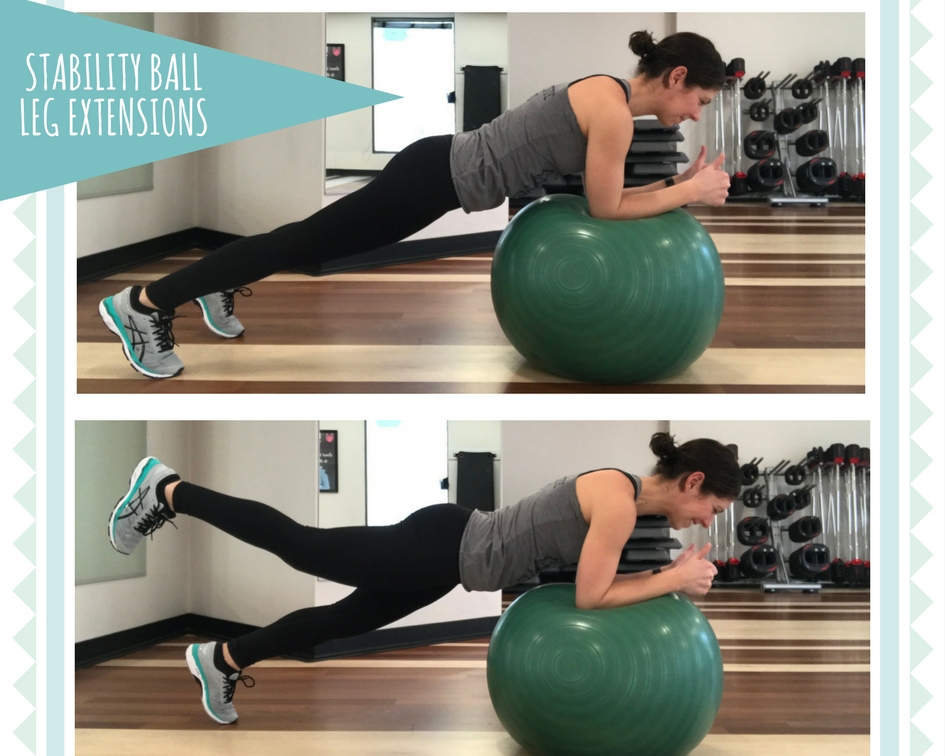
Stability Ball Leg Extensions: Place your forearms on the stability ball (thumbs up!), your feet shoulder width apart, toes touching the ground. Create a flat board with your body, bracing your core, being mindful that your hips do not sag and your butt does not lift up too high towards towards the sky. Slowly lift one leg towards the sky, focusing on squeezing your glutes as you do so, bringing the leg directly behind you (not out to the side). Return your leg to the starting position. Repeat with other side.
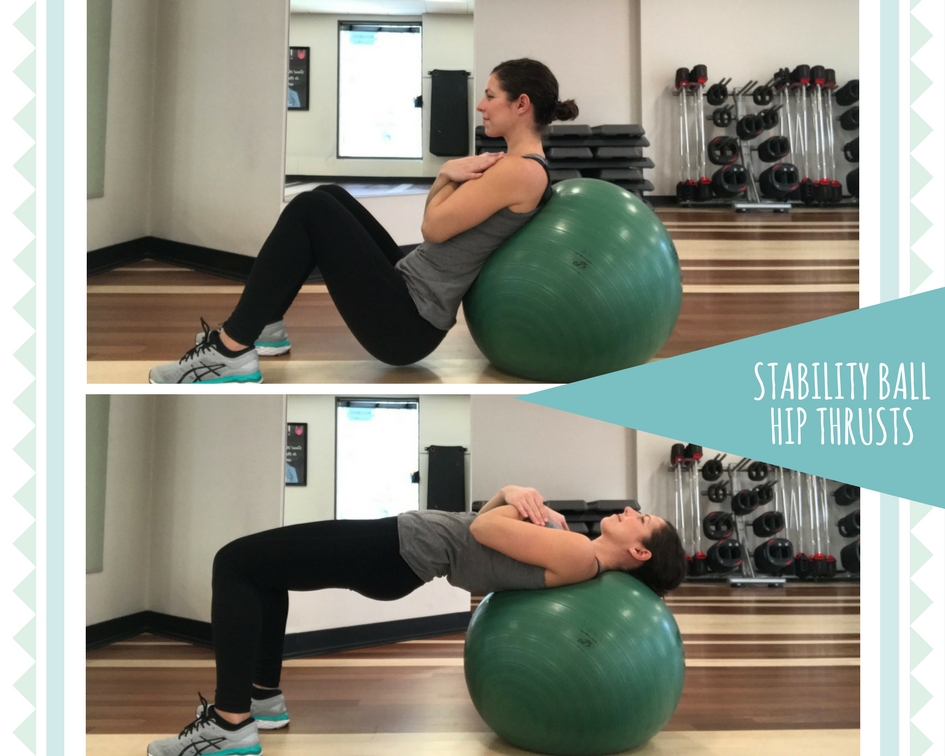
Stability Ball Hip Thrusts: Your upper back, shoulders and neck should be resting on the stability ball. Place your feet about hip width apart to help stabilize yourself. Lift your bottom an inch or two off the ground (as depicted in first image). Squeeze your glutes and lift your hips to create a nice straight line from your head to your knees. Slowly returning to the starting position, not letting your bottom touch the floor. Repeat.
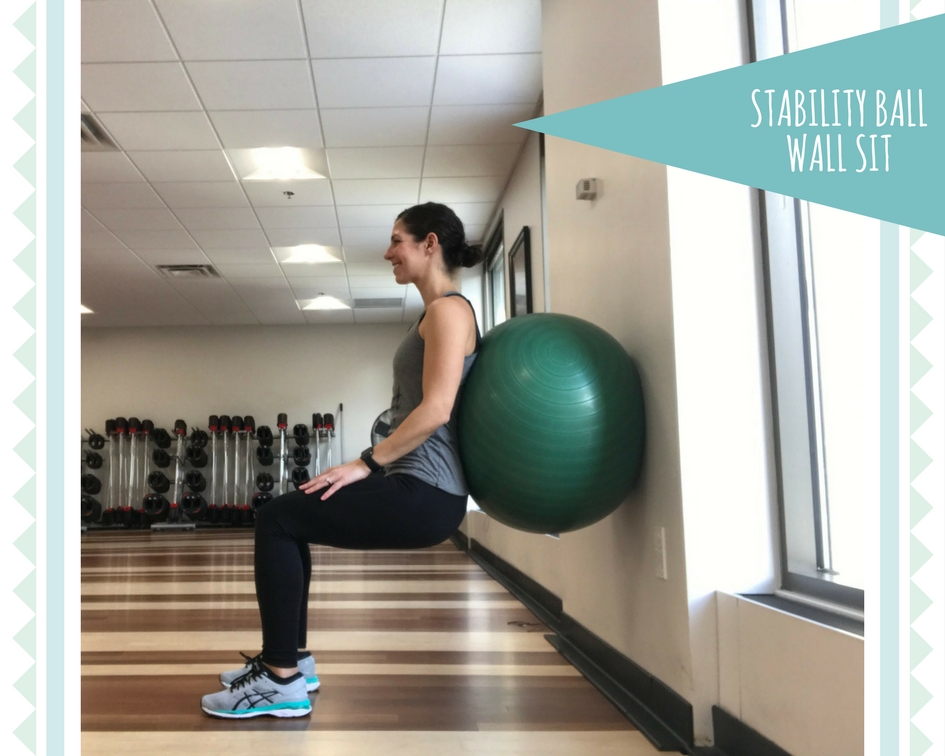
Stability Ball Wall Sit: Place the stability ball between you and a wall behind you, holding a squat position with your knees at a 90 degree angle, feet hip-width apart, and your thighs parallel to the floor. Brace your core so your back is not arching, and your shoulders are not rounding forward. Hold this position.
Stability Ball Squats: Stand with the stability ball between you and a wall behind you, placing the ball at your lower back. Slowly slide down into a squat position, rolling the ball towards the center of your back. Your knees should be at a 90 degree angle, feet hip-width apart, and your thighs parallel to the floor. Brace your core so your back is not arching, and your shoulders are not rounding forward. Slowly return to the starting position. Repeat.
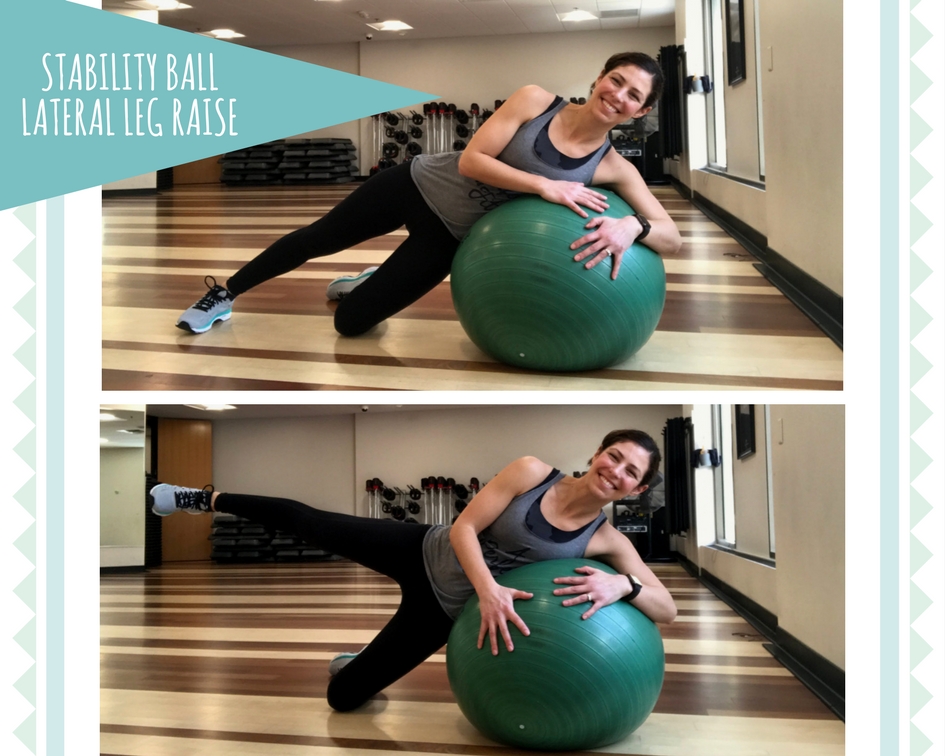
Stability Ball Lateral Leg Raises: Lie on your side with the stability ball positioned under you, your hands holding the stability ball whichever way is most comfortable. The leg closest to the floor should be bent at the knee and touching the ground. The other leg should be straight, slightly touching the ground with your foot. Lift the straight leg up towards the sky until it is about parallel with the floor, and slowly bring it back down to the floor. Repeat.
Trainer tips: If you are more comfortable, or holding the initial position is too hard, feel free to brace yourself on the stability ball with your hands touching the floor. Your focus should be on lifting that leg to the side, not wobbling around!
. . .
Now that you’re familiar with a few full body exercises you can perform on a stability ball, let’s jump right into how you can use them to create your own workout!
STABILITY BALL WORKOUT
Simply do the following:
- Pick 2-3 exercises from each muscle group (upper body, core & lower body).
- Perform 10-15 repetitions of each exercise in the first muscle group. Repeat 3 times.
- Perform 10-15 repetitions of each exercise in the second muscle group. Repeat 3 times.
- Perform 10-15 repetitions of each exercise in the third muscle group. Repeat 3 times.
OR
- Pick 3 exercises from each muscle group (upper body, core & lower body).
- Perform each exercise in the first muscle group for 30 seconds to 1 minute. Repeat 3-4 times.
- Perform each exercise in the second muscle group for 30 seconds to 1 minute. Repeat 3-4 times.
- Perform each exercise in the third muscle group for 30 seconds to 1 minute. Repeat 3-4 times.
OR
To make things really easy, set your timer for 30 minutes. Run through each exercise on this list (spending about a minute on each) until your timer is up!
xoxo,
Zoe Lauryn
P.S. If you haven’t already done so, make sure to subscribe to my email list! By signing up here, you’ll be signing up for exclusive content, including fun workouts, yummy recipes, thoughtful mindset work and more. You don’t want to miss out!

These are great! I have been thinking of getting a stability ball. Can you recommend a certain brand or size that would be good for this workout?
I’m so glad you liked them! I’d recommend a medium sized stability ball (65 cm) would be pretty good depending on your height! If you are shorter you may need a smaller ball, and vice versa if you’re taller. Theraband is a great brand. I hope this helps!